Help
User guide
On this page
Installation & requirements
What you need
- A Mac with Apple Silicon (M1 or later). Intel Macs are not supported.
- macOS 15 Sequoia or later.
- An ElevenLabs account. Voice generation uses your own ElevenLabs plan (see Connecting your ElevenLabs account).
- An internet connection. Generation happens through ElevenLabs, so Robot Voice Bridge does not work offline.
One optional feature requires macOS 26 Tahoe: with Apple Intelligence enabled, Robot Voice Bridge can categorize performance tags on-device (see Performance tags). All other features work on Sequoia.
Installing
- Download Robot Voice Bridge from robotvoicebridge.com.
- Open the disk image and drag Robot Voice Bridge to the Applications folder shown beside it. Then eject and delete the disk image.
- Open Robot Voice Bridge. The first time you launch it, macOS asks you to confirm that you want to open an app downloaded from the internet. Click Open.
On first launch, Robot Voice Bridge starts your 14-day free trial and walks you through its initial permissions. Updates are handled in the app. See Updating.
Connecting your ElevenLabs account
Robot Voice Bridge uses your own ElevenLabs account. Your voices come from your ElevenLabs library, and ElevenLabs bills generation against your plan. To connect the app, create an API key on the ElevenLabs site and paste it into Robot Voice Bridge.
Create the API key
- Go to elevenlabs.io/app/developers/api-keys and sign in. To reach the same page from the ElevenLabs dashboard, choose Developers in the sidebar, then API Keys.
- Click Create API Key and give it a unique name, such as
Robot Voice Bridge. - New keys are restricted by default. Enable the five permissions in the table below and leave the others off.
- Leave Expire After set to Never unless you specifically want the key to expire. A monthly credit limit is optional.
- Click Create, then copy the key and paste it into Robot Voice Bridge. ElevenLabs shows the key only once, so store it in a password manager or another secure location. If you lose it, delete the old key and create a new one.
The five permissions Robot Voice Bridge needs:
| Permission | Set to | What the app uses it for |
|---|---|---|
| Text to Speech | Access | Generating takes and voice previews |
| Speech to Speech | Access | Voice direction |
| Voices | Read | Accessing your voice library |
| User | Read | Validating the key and showing your plan and credits |
| Pronunciation Dictionaries | Write | The pronunciation editor |
Everything else, including Speech to Text, Sound Effects, and Dubbing, can stay off.
Connect the app
- Open a project in Robot Voice Bridge and find ElevenLabs API Key at the top of the sidebar.
- Paste the key into Paste API key… and click Connect.
Once connected, the sidebar shows your first name, ElevenLabs plan, and remaining credits. To disconnect, click the × button beside your name.
If Invalid API key appears, the key may have pasted incorrectly or may be missing one of the required permissions. See Troubleshooting.
Your API key is stored in the macOS Keychain. It is not sent to us. Generation happens directly between Robot Voice Bridge and ElevenLabs. Because the key is stored in Keychain, you stay signed in across launches and reinstalls.
What generation costs
Each generation uses credits from your ElevenLabs plan: roughly one credit per character of text, and about half that on Draft. WAV output requires an ElevenLabs Pro plan or higher. See Output format.
Permissions
On first launch, Robot Voice Bridge shows a short setup window called Let's set things up. Microphone access is the only permission requested there. It is needed only for voice direction.
| Permission | What it's for | When macOS asks |
|---|---|---|
| Microphone | Recording voice direction | During setup or the first time you record |
| Automation | Spotting into Pro Tools or Logic Pro | The first time you spot to each DAW |
The setup window updates as permissions are granted. Click Continue when you are finished. You can review microphone access later under Robot Voice Bridge → Settings… → Permissions.
Spotting permission is separate from first-run setup. macOS asks for it the first time Robot Voice Bridge controls Pro Tools or Logic Pro.
If recording or spotting fails because of a permission setting, see Troubleshooting.
Trial & license activation
The free trial
Robot Voice Bridge starts a fully functional 14-day trial the first time it launches. Your remaining time appears under Robot Voice Bridge → Settings… → License.
The trial is tied to your Mac. Reinstalling the app does not restart it.
Buying and activating
- Purchase a subscription at robotvoicebridge.com ($12/month, cancel any time).
- Your license key arrives by email from info@robotvoicebridge.com in the format
RVB-XXXX-XXXX-XXXX-XXXX. If it does not arrive within a few minutes, check your spam folder. - Open Robot Voice Bridge → Settings… → License, click Enter License Key…, paste the key, and click Activate. You can activate at any point during the trial.
Your key does not change when the subscription renews, so keep the original email. Lost it? Have it re-sent from the license key recovery page.
Teams
Buying for more than one person? Choose the number of seats at checkout. Each seat is $12 per month and has its own license key, one per person. The keys arrive together in one email, and each key activates one Mac at a time. To change the number of seats, email support@robotvoicebridge.com.
Managing your license
A license key runs on one Mac at a time. Activating another Mac moves the key to that Mac.
Robot Voice Bridge → Settings… → License shows your license status and provides these controls:
- Status badge: "Active", "Active (offline)", "Couldn't confirm", "Trial — N days left", "Trial ended", "Subscription ended", or "In use on another Mac"
- Enter License Key…: activates this Mac.
- Manage subscription…: opens the website for billing, renewal, or cancellation.
- Deactivate this Mac…: signs out this Mac and frees the license for another one.
Moving between Macs
- On the Mac you want to use, open Robot Voice Bridge → Settings… → License, click Enter License Key…, and paste your key.
- If the license is active on another Mac, Robot Voice Bridge names that Mac and asks whether to move the license. Click Use on This Mac.
- No action is required on the previous Mac. If Robot Voice Bridge is already open there, it continues working until the next launch.
After a license has been moved away from a Mac, returning it there is one click: the activation window offers Use on This Mac without requiring the key again.
Robot Voice Bridge quietly checks its license each time it opens. Being offline or away never signs you out, and you are never asked to re-enter your key. If this Mac hasn't been able to reach the license server for 30 days, the app pauses with "Couldn't confirm your license" until it can; connect to the internet and click Try Again.
Canceling: You keep access until the end of the period you paid for. A refunded charge ends access immediately. See the refund policy.
Your first voiceover
A basic Robot Voice Bridge workflow looks like this:
- Create a project. Choose File → New Project (⌘N), name it, and click Create. (Projects & tabs)
- Write a line. Click the first line and type your copy. Press Esc when you are finished. (Script lines)
- Choose a voice. Press ⌘⇧B, choose a voice, then click Use voice. (Choosing voices)
- Generate. Press ⌘G or click Generate on the line. A waveform appears when generation finishes. (Generating audio)
- Listen. Press Space to play, or click the waveform to scrub. (Playback)
- Direct it. On Expressive, add a tag such as
[warm]. On Standard or Draft, adjust the sidebar controls instead. Punctuation affects pacing on every model. Regenerate with ⌘G. Each result is saved as a separate take. (Performance tags, Models & modes, Takes) - Deliver it. With Pro Tools or Logic Pro open, press S to spot the selected take to the current playhead location. Or drag the hand icon on the waveform into any app that accepts audio files. (Spotting with S, Drag & drop)
The core loop is: write → direct → generate → audition → deliver.
Projects & tabs
Everything in Robot Voice Bridge lives inside a project: script lines, voice assignments, per-line settings, pronunciation entries, and generated takes. A project is an ordinary folder on disk, so it can be backed up, moved, or archived like any other folder.
Creating a project
Create a separate project for each job (a spot, episode, podcast, or other deliverable) so its script, audio, and pronunciation entries stay together.
- Choose File → New Project (⌘N), or click New project in the welcome window.
- Enter a name in PROJECT NAME.
- Choose a LOCATION. The default, Robot Voice Bridge Projects, is
~/Documents/Robot Voice Bridge Projects. Choose Prompt for location to save somewhere else. The menu remembers up to five custom locations. - Click Create, or press Return. Press Esc to cancel.
Project names cannot be empty or contain /, \, or :. If another project with the same name already exists at that location, choose a different name or location.
What a project is on disk
A project folder contains two main items: a <Name>.rvb project file, which stores the script and settings, and an Audio Files folder containing generated takes, recordings, imports, and exports. The project is not a macOS package, so you can browse it normally in Finder.
Double-click <Name>.rvb to open the project in Robot Voice Bridge. Double-clicking the folder itself opens it in Finder.
Treat the folder as the project. To back up, archive, or hand off a project, copy or zip the entire folder. The .rvb file and its audio belong together.
Opening projects
You can open a project in several ways:
- File → Open Project… (⌘O): choose either the project folder or the
.rvbfile inside it. - File → Open Recent: shows up to 10 recent projects. Missing projects are marked (missing).
- File → Open Most Recent Project (⌘⇧O): opens the most recent project that still exists.
- Double-click the project's
.rvbfile in Finder. - Use Open recent or Open project… in the welcome window.
If a project cannot be opened, the alert explains why:
| Message | What it means |
|---|---|
| "This project was created with a newer version of Robot Voice Bridge." | Update Robot Voice Bridge, then reopen the project. |
| "This doesn't appear to be a Robot Voice Bridge project." | Select the project folder or the .rvb file inside it. |
| "Couldn't open this project. The file may be corrupted." | The .rvb file could not be read. Restore the project from a backup. |
Saving and crash recovery
Save with File → Save Project (⌘S). File → Save Project As… (⌘⇧S) saves a copy under a new name or location. If you close a project with unsaved changes, Robot Voice Bridge asks whether to save them.
The app also stores recovery snapshots a few seconds after edits in the hidden .voicebridge folder inside the project. If Robot Voice Bridge did not quit cleanly, the next time you open that project it offers to recover the unsaved changes.
Discard abandons everything since your last manual save. If you are unsure, choose Recover. You can always undo or save a new copy afterward.
Script tabs
Script tabs divide a project into sections such as scenes, alternate versions, or character groups. Each tab contains its own lines. A new project begins with one tab named Script 1, and Robot Voice Bridge remembers the active tab when you reopen the project.
| Action | How |
|---|---|
| Add a tab | Click + in the tab strip, or press ⌘T. |
| Switch tabs | Click a tab, or press ⌘⇧] / ⌘⇧[ for next / previous. |
| Scroll the tab strip | When the tabs no longer fit, the strip scrolls. |
| Jump to any tab | When the strip scrolls, a list button appears at its left end. Click it to choose any tab by name. The arrows beside it and at the right end step to the previous or next tab. |
| Rename a tab | Double-click the tab name, or right-click and choose Rename. |
| Duplicate a tab | Right-click and choose Duplicate. |
| Close a tab | Press ⌘⇧W, or right-click and choose Close. Available only when the project has more than one tab. |
| Reorder tabs | Drag a tab to a new position. |
| Move a line to another tab | Drag the line onto the tab and hold briefly. Hold ⌥ while dragging to copy instead. |
Tab names can become clip names in your DAW. When several lines are delivered as one continuous clip, the result is named <Tab> - Lines X-Y. Descriptive tab names therefore produce cleaner timelines than Script 1.
Several projects at once
You can keep multiple projects open, one per window. Menu commands and keyboard shortcuts apply to the frontmost window. Line cut, copy, and paste remain within a single project. Lines cannot be pasted from one project into another.
Working with script lines
A line is Robot Voice Bridge's basic unit: one piece of copy, read by one voice, with its own generation settings and takes. Delivering audio always operates on the currently selected line or lines.
Anatomy of a line
Each line shows its voice color along the left edge, a header with the voice name, and the script text. After generation, a waveform strip with playback controls and a drag handle appears below the text. The Generate button becomes Regenerate after the first take, and a Take N control appears beside it.
Select mode vs. Edit mode
Lines have two modes:
- Select mode: click a line once. Space plays it, S spots it, ↑ / ↓ move the selection, ⇧↑ / ⇧↓ extend the selection, and ⌘A selects all lines.
- Edit mode: click the line's text, or press Return on a selected line, to place the cursor and type. Press Esc to return to select mode.
- Tab / ⇧Tab move to the next / previous line in either mode.
Adding, moving, and removing lines
| Action | How |
|---|---|
| Add a line | ⌘⌥L, or click Add line. New lines inherit the selected line's voice and settings. |
| Duplicate a line | ⌘D. Useful for comparing two directions of the same copy. |
| Delete a line | ⌘⌫, or right-click → Delete line. |
| Reorder | Drag the six-dot handle in the left gutter, or press ⌘⌥↑ / ⌘⌥↓. |
| Split into sentences | ⌘⇧Return splits the selected line into one line per sentence while preserving its voice and settings. Bracket tags remain intact. |
| Move to another tab | Drag the line onto a tab. Hold ⌥ to copy instead. |
In select mode, ⌘X / ⌘C / ⌘V cut, copy, and paste whole lines, including their settings. The line clipboard is project-specific. ⌘Z undoes line operations as well as text edits.
Right-clicking a line also provides Delete generated audio and, when applicable, Delete direction audio.
Choosing voices
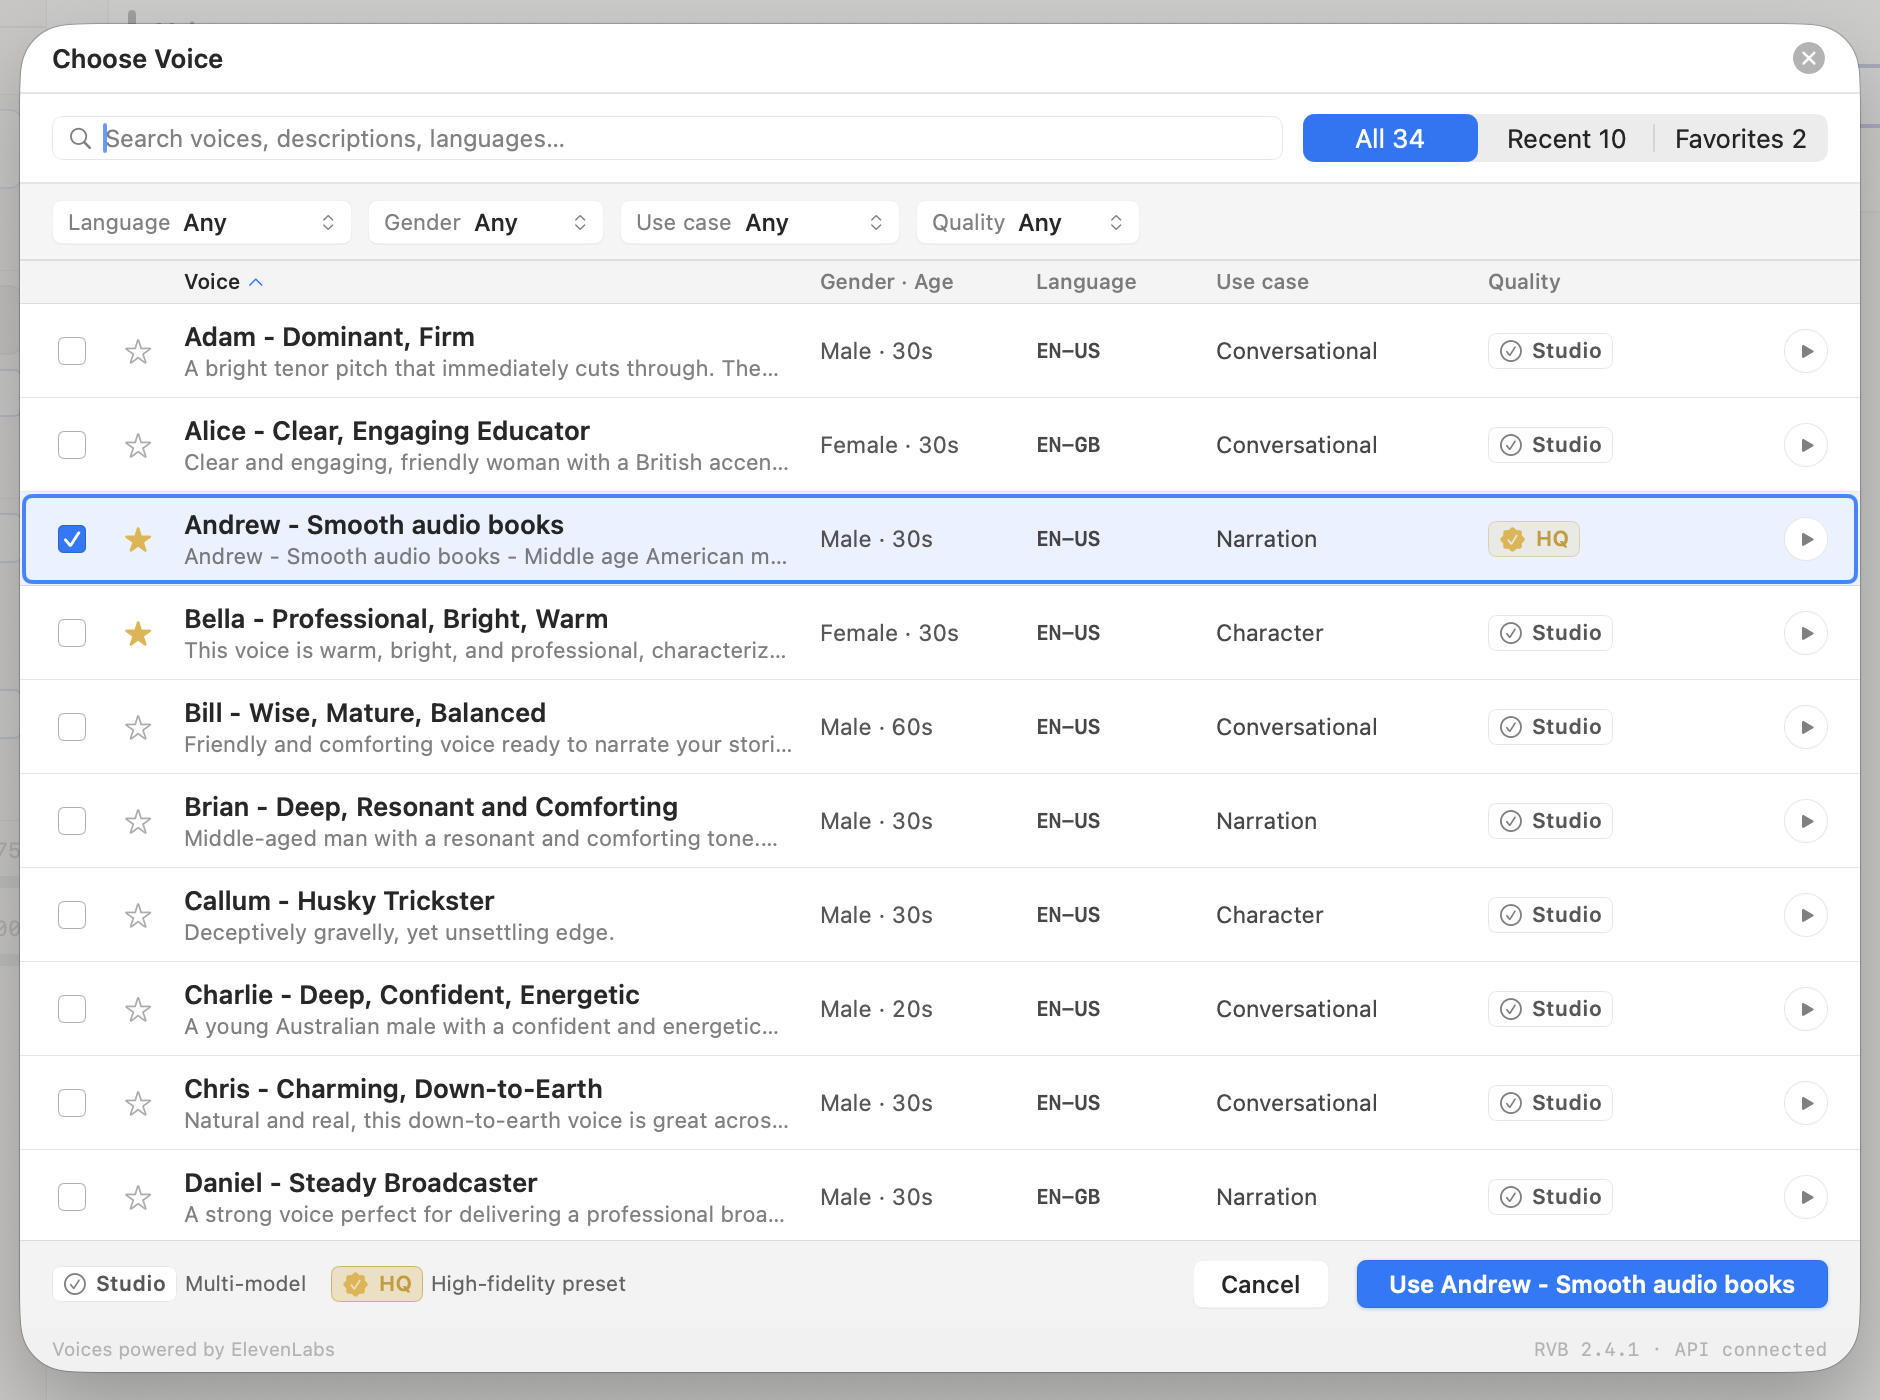
Voices come from your ElevenLabs library. Press ⌘⇧B, click the current voice in the sidebar, or choose Browse voices when no voice is assigned to open the Choose Voice sheet.
Finding a voice
- Search matches voice names, descriptions, and languages.
- Scopes: All, Recent (the last 10 voices used), and Favorites.
- Filters narrow by Language, Gender, Use case, and Quality. Clear filters resets them.
- Columns can be sorted by clicking their headers.
Click a row's play button to preview the voice. If a preview fails, an orange warning triangle appears. Click it to retry. In the Quality column, Studio marks a multi-model voice and HQ marks a high-fidelity preset.
Assigning it
Select a voice and click Use voice (⌘Return). Esc cancels, the arrow keys move through the list, and Space previews the highlighted voice.
Each line can use a different voice. Assigned voices also receive a cast color, shown along the line's left edge.
Voice choice usually matters more than generation settings. Audition candidates against the most demanding line in your script before committing.
Models & modes
The MODEL section of the sidebar selects the ElevenLabs model for the current line. Models are set per line, so you can work cheaply in Draft and switch selected lines to a final model later.
| Model | ElevenLabs model | Best for | Notes |
|---|---|---|---|
| Expressive | Eleven v3 (alpha) | Emotional or character-driven performances | Supports performance tags. Pacing comes from punctuation and tags. No Speed or Stability slider. |
| Standard | Multilingual v2 | Reliable narration | 29 languages. No tag support. |
| Draft | Flash v2.5 | Fast experimentation | Fastest and roughly half the credits. 32 languages. |
The text beneath the buttons shows the underlying ElevenLabs model. Click it for more detail. New lines default to Expressive.
Expressive modes: Creative, Natural, Robust
Expressive adds a second row of controls:
- Creative: the most expressive and variable. Also the most likely to produce unexpected results.
- Natural: balanced and closest to the reference voice.
- Robust: the most consistent, but less responsive to direction tags.
Start with Natural. Use Creative when you want more performance variation, or Robust when consistency matters more than expressiveness.
Sliders
The SETTINGS section controls generation for the selected line. Changes apply the next time you generate.
| Slider | Range (default) | What it does | Models |
|---|---|---|---|
| Stability | 0–1 (0.5) | Lower values allow more variation. Higher values are steadier. | Standard, Draft |
| Similarity | 0–1 (0.75) | How closely the result follows the reference voice. | All |
| Style | 0–1 (0.0) | Amount of style exaggeration. | All |
| Speed | 0.7–1.2 (1.0) | Playback pace. | Standard, Draft |
Presets
A preset stores the current voice, model, mode, sliders, and direction mode under one name.
- Click the PRESET control in the sidebar to switch presets.
- Save updates the current preset with the current settings.
- Save As creates a new preset.
- Use the trash button beside a preset to delete it. Default cannot be deleted.
Performance tags
Performance tags are bracketed directions such as [whispers], [excited], or [after a long silence]. Expressive (Eleven v3) interprets them as stage directions. Standard and Draft do not.
The tag toolbar
The tag toolbar appears above the script when the selected line uses Expressive. Toggle between its two layouts with the chevron, ⌘⇧T, or Script → Expand Tag Toolbar / Compact Tag Toolbar.
- Compact: four menus (Emotion, Vocal, Pacing, Character) plus Custom and STRESS.
- Expanded: displays the built-in tags as grouped pills.
While editing text, clicking a tag inserts it at the cursor. In select mode, the tag is appended to the end of the line. Tag insertion can be undone with ⌘Z.
Built-in tags
| Category | Color | Built-in tags |
|---|---|---|
| Emotion | Pink | [excited] [sad] [angry] [warm] [fearful] [confident] |
| Vocal | Amber | [whispers] [sighs] [laughs] [crying] [shouting] |
| Pacing | Green | [breathes] [slows down] [rushed]. pause ... inserts .... long pause — inserts — |
| Character | Blue | [sarcastically] [deadpan] [accent] |
Emotion tags describe emotional state. Vocal tags describe sound or vocal quality. Pacing tags affect timing and rhythm. Character tags describe persona, attitude, or accent.
Free-form and compound tags
The built-in tags are examples, not a fixed vocabulary. You can type any bracketed direction, such as [a little nervous], [bittersweet], [British accent], or [pirate voice].
Robot Voice Bridge recognizes thousands of tags and assigns them to categories. Compound tags are categorized by their head word: [nervously whispers], for example, is treated as Vocal because whispers is the head word.
Tag response depends on the voice. A naturally quiet voice may not respond convincingly to [shouting]. Choose a voice whose range suits the performance.
STRESS
STRESS is not a tag. It uppercases selected words, which Expressive interprets as emphasis. Select one or two words and click STRESS or press ⌥⇧S. Apply it again to return the text to lowercase.
Custom tags
Save directions you use often so they appear beside the built-in tags:
- Click Custom in the tag toolbar.
- Click Add Tag.
- Enter a label.
- Choose Emotion, Vocal, Pacing, or Character. If Apple Intelligence categorization is enabled, Robot Voice Bridge suggests a category as you type. Your manual choice takes precedence.
Custom tags can be enabled, disabled, or deleted. They are available across all projects.
Tag pills and Apple Intelligence
When Use Apple Intelligence to categorize tags is enabled under Robot Voice Bridge → Settings… → Permissions, recognized tags appear as colored pills and unrecognized tags can be classified on-device. This requires macOS 26 Tahoe with Apple Intelligence enabled.
If classification fails, Robot Voice Bridge asks you to choose a category. Right-click a pill to change its category or remove it from the custom database.
On macOS 15 Sequoia, or with Apple Intelligence tagging turned off, tags remain plain bracketed text. This changes only their appearance, not generation.
Tags on Standard and Draft
Because Standard and Draft would otherwise read bracketed tags aloud, Robot Voice Bridge strips those tags from the text before generation. The tags remain visible in your script but have no effect until you switch the line back to Expressive.
For exact pauses on Standard or Draft, use a break tag instead. See Writing for delivery.
Writing for delivery
The text itself strongly affects delivery. Before changing sliders or adding tags, use punctuation, capitalization, and context to shape the read.
Punctuation is pacing
| Punctuation | Typical effect |
|---|---|
Comma , | Short pause |
Period . | Full stop |
Em dash — | Strong break |
Ellipsis ... | Hesitation or trailing pause |
You can also extend a pause with repeated punctuation, although results vary by voice and model.
Emphasis and narration cues
ALL CAPS usually produces emphasis. Use it sparingly, typically one or two words at a time. On Expressive, select the words and press ⌥⇧S.
Descriptive narration cues nudge delivery: writing "she said quietly" steers the model toward that read. The cue is spoken along with everything else, so trim it from the rendered audio in your DAW after spotting.
Writing for Expressive
Expressive responds to performance tags, punctuation, and surrounding context. It does not have a Speed slider.
- Give short lines more context when needed. Very short lines can be inconsistent. Adding surrounding text can stabilize the performance.
- Generate multiple takes. Expressive is an alpha model, so variation is expected. Regenerate and choose the best take, or duplicate a line with ⌘D to compare different directions side by side.
Break tags on Standard and Draft
Standard and Draft support break tags for exact pauses of up to about three seconds:
Give it a moment. <break time="2s" /> There it is.
Use them sparingly. Heavy use can make a read less stable, and punctuation is often enough.
Break tags do not work on Expressive. Use punctuation or a pacing direction instead.
Voice choice matters most
A warm voice won't yell, and a shouty voice won't whisper. No amount of direction rescues a voice whose range doesn't include what the script needs.
For names, brands, and invented terms, use a pronunciation entry. For more detail, see ElevenLabs' prompting guide.
Pronunciation
When a voice repeatedly mispronounces a word, add a pronunciation entry instead of respelling the script each time. Pronunciation entries are stored per project.
Adding an entry
- Click Pronunciation at the bottom of the sidebar.
- Click Add Entry.
- Choose Simple or Advanced.
- Enter the word exactly as it appears in the script.
- Define its pronunciation.
- Save the entry, then click Done.
Simple mode (alias)
Simple mode substitutes a phonetic respelling before generation and works on all models. In Pronounce as, use capital letters for stressed syllables and dashes or spaces between syllables. For example, Silvestri → sill VEH stree.
Advanced mode (phonemes)
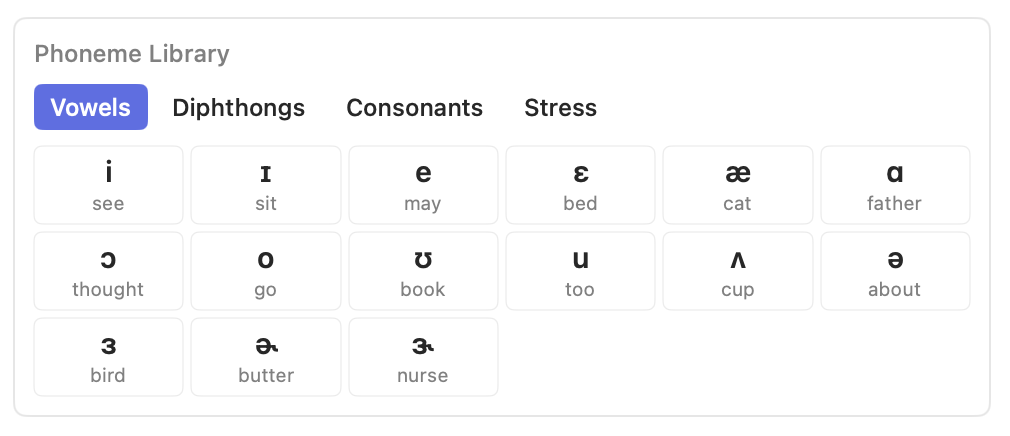
Advanced mode defines pronunciation with phonemes using CMU Arpabet or IPA. Choose CMU or IPA, then add phoneme chips from the library. Hover a chip for an example word. The Sounds like row gives a rough reading of the sequence, and Edit exposes the raw phoneme string.
CMU marks stress with a number after each vowel: 1 primary, 2 secondary, 0 unstressed. IPA uses ˈ for primary stress and ˌ for secondary stress.
Switching between CMU and IPA clears the current phoneme sequence. Choose the alphabet before you begin.
Advanced phoneme entries apply only to Expressive. Standard and Draft use the word's normal pronunciation. If a word must work across all models, use Simple mode instead.
What applies where
| Entry type | Expressive | Standard | Draft |
|---|---|---|---|
| Simple (alias) | Applied | Applied | Applied |
| Advanced (phoneme) | Applied | Not applied | Not applied |
Managing entries
Each row shows whether the entry is enabled, the word, its mode, and a pronunciation preview. Use the pencil button to edit and the minus button to delete. Disable an entry to compare generation with and without it.
To reuse entries from another job, click Import from Project… at the bottom of the list and choose that project's folder or .rvb file. Its entries are copied in, and any word already in this project is skipped, so nothing you have tuned here is overwritten.
Pronunciation entries are stored in the project's .rvb file, so they move with the rest of the project.
Generating audio
Generation turns a line's text, or its voice direction, into audio using that line's voice, model, and settings. A line needs both text and an assigned voice before it can generate.
One line or many
- One line: press ⌘G, or click Generate. While generation is running, the line shows Generating…. When it finishes, the waveform appears and the button becomes Regenerate.
- Several lines: select them and press ⌘G. The bottom bar shows generation progress. If some selected lines have no audio, Generate fills those in. If all selected lines already have audio, Regenerate creates new takes.
What the app does automatically
- On Standard and Draft, the previous line's text is sent for tonal continuity, so consecutive lines flow naturally.
- On Standard and Draft, bracketed performance tags are removed before generation.
- Pronunciation entries are applied where supported.
- A short tail of silence is added so the final word does not clip.
- If ElevenLabs temporarily rate-limits a request, Robot Voice Bridge retries automatically before showing an error.
Costs and limits
Generation uses credits from your ElevenLabs plan: roughly one credit per character, and about half that on Draft. The sidebar updates your remaining credits as you work.
ElevenLabs also limits the amount of text per request: approximately 5,000 characters on Expressive, 10,000 on Standard, and 40,000 on Draft. Normal script lines are usually far below those limits.
When generation fails
- Generation Failed: the alert includes the underlying reason, such as a network error, ElevenLabs error, or credit/quota problem.
- ElevenLabs is busy right now: the request remained rate-limited after automatic retries. Try again shortly. Repeated failures may indicate a plan concurrency limit.
See Troubleshooting for more detail.
Takes & comparisons
Every generation is saved as a numbered take rather than replacing the previous one. The newest take becomes active and is the one used for playback, spotting, dragging, and exporting.
Flipping through takes
- Click Take N beside the line's Generate button.
- The popover lists takes newest first, with playback, age, and duration.
- Click a take to make it active and audition it.
Right-click a line and choose Delete generated audio to remove all of its takes.
A/B-ing a read
- Same direction, different performances: regenerate and compare takes from the Take N menu.
- Different directions: duplicate the line (⌘D) and change its copy, tags, voice, model, or other settings. Each line keeps its own setup, making side-by-side comparison easy.
Voice direction (speech-to-speech)
Voice direction lets you guide timing, intonation, inflection, and cadence by recording or importing a reference performance.
Recording a direction
- Click the microphone toggle in the line header. The line switches to voice mode and shows Record direction. The first time you record, macOS asks for microphone access.
- Click Record direction and perform the line.
- Click again to stop. A DIRECTION waveform appears, and the button changes to Re-record.
- Generate with ⌘G. ElevenLabs re-performs the recorded direction using the selected voice.
You can also drop a WAV, MP3, M4A, or AIFF file onto the line to use it as direction audio.
Worth knowing
- Recording uses the input selected under Settings → Audio Devices. While recording, Robot Voice Bridge temporarily makes it the system default input, then restores the previous default afterward.
- If recording stops unexpectedly, the partial recording remains attached to the line.
- The microphone toggle switches between text and voice direction modes without deleting the recorded direction.
- Recordings and imported direction files are copied into
Audio Files/Recordingsinside the project folder.
Playback & monitoring
- Space plays or stops the selected line. If several fully generated lines are selected, Robot Voice Bridge plays them in order and shows a Play All / Stop control in the bottom bar.
- Click or drag on a waveform to scrub.
- A line's play button plays only that line.
Output and input devices
Choose devices under Robot Voice Bridge → Settings… → Audio Devices. Both input and output can use System Default or a specific connected device.
If a selected device is disconnected, Robot Voice Bridge falls back to the system default. When the device returns, the app restores your previous choice automatically.
If playback fails to route, Robot Voice Bridge shows a Playback Failed alert and adds diagnostic information under Settings → Audio Devices. See Troubleshooting.
DAW detection
The top-right corner of the project window shows whether a supported DAW is running. Pro Tools and Logic Pro appear by name with a green status dot. Otherwise the app shows No DAW detected.
Detection only means that the DAW application is running. Robot Voice Bridge does not read the open session, so it does not know the session name, sample rate, or bit depth. Set Output format to match your session manually.
Other applications, such as Reaper, Nuendo, Premiere Pro, and Final Cut Pro, receive audio through drag & drop.
Spotting with S
Spotting a line
- In your DAW, place the playhead where the audio should begin and select the destination track.
- In Robot Voice Bridge, select one or more generated lines. Make sure you are in select mode. Press Esc if the text cursor is active.
- Press S, or click Spot in DAW in the bottom bar.
Spotting is available only when a supported DAW is detected and every selected line has generated audio.
How each DAW receives audio
| DAW | Method | Permission needed | Where the clip lands |
|---|---|---|---|
| Pro Tools | Native spotting | Automation | Selected track at the playhead |
| Logic Pro | Native spotting | Automation | Selected track at the playhead |
| Reaper, Nuendo, Cubase, Premiere, Final Cut, Resolve, and others | Drag & drop | None | Wherever you drop it |
The first spot into Pro Tools or Logic Pro triggers a macOS Automation prompt. If you deny it, spotting remains unavailable until you enable Robot Voice Bridge under System Settings → Privacy & Security → Automation.
What the clip is called
- Single line:
<Voice> - <first four words>.<NN>, whereNNis the line number. Example:Andrew - Give it a moment.03. - Several lines as one clip:
<Tab> - Lines X-Y.
Names are limited to 60 characters. Characters that are invalid in file names (/ \ : ? " < > | *) are removed.
If spotting fails, Robot Voice Bridge shows a Spot Failed alert with the reason. See Troubleshooting.
Continuous vs. Individual
When you select two or more generated lines, a Continuous | Individual control appears in the bottom bar. The choice applies to spotting, dragging, and exporting:
- Continuous: combines the selected lines into one clip, in script order, named
<Tab> - Lines X-Y. Use this for material that should arrive as one continuous read. - Individual: keeps each line as a separate clip and, when spotting, places them end-to-end starting at the playhead. Use this when the lines will be edited or positioned independently.
The setting is remembered across projects. If selected lines were generated at different sample rates, a Continuous file is rendered at 48 kHz / 24-bit.
Drag & drop
Any application that accepts audio files can receive a take by drag and drop. Dragging always creates a copy. Files inside the Robot Voice Bridge project remain in place.
- One line: drag the hand icon at the right side of the waveform into the destination app.
- Several lines: select them and drag the hand icon in the bottom bar. The Continuous | Individual setting determines whether Robot Voice Bridge provides one combined file or separate files.
Dragged files use the same naming rules as spotted clips.
Exporting files
Choose File → Export Audio… (⌘⇧E) to save the active takes of the selected lines to disk. Export honors the Continuous | Individual setting.
Exports use your output format settings and standard clip naming.
Output format
Robot Voice Bridge → Settings… → Output Format controls the format used for generation, spotting, dragging, and exporting:
- MP3 (default): 64, 128, or 192 kbps. Default: 192 kbps.
- WAV: 16- or 24-bit at 44.1 or 48 kHz. Default: 24-bit / 48 kHz.
Robot Voice Bridge does not read your DAW session settings, so match them manually.
WAV output requires an ElevenLabs Pro plan or higher. On lower tiers, ElevenLabs returns MP3 instead. Robot Voice Bridge still produces a file compatible with your workflow, but the source audio supplied by ElevenLabs is 192 kbps MP3.
Settings reference
Open Robot Voice Bridge → Settings… (⌘,).
Appearance
Theme: Auto (follows macOS), Light, or Dark.
Audio Devices
Choose the input used for voice direction and the output used for playback. Each defaults to System Default. Disconnected devices fall back to the system default and are restored when they reconnect. Routing failures add a diagnostic row here.
Output Format
MP3 at 64/128/192 kbps, or WAV at 16/24-bit and 44.1/48 kHz. See Output format.
Permissions
Shows microphone permission and the optional Use Apple Intelligence to categorize tags toggle. The latter requires macOS 26 Tahoe with Apple Intelligence enabled.
License
Shows license status and controls for subscription management, activation, and deactivation. See Trial & license activation.
Keyboard shortcuts
| Action | Shortcut |
|---|---|
| File | |
| New Project | ⌘N |
| Open Project… | ⌘O |
| Open Most Recent Project | ⌘⇧O |
| Save Project / Save Project As… | ⌘S / ⌘⇧S |
| Export Audio… | ⌘⇧E |
| Close Window | ⌘W |
| Settings… | ⌘, |
| Editing | |
| Undo / Redo | ⌘Z / ⌘⇧Z |
| Cut / Copy / Paste line (or text while editing) | ⌘X / ⌘C / ⌘V |
| Select all lines | ⌘A |
| Edit selected line / stop editing | Return / Esc |
| Next / previous line | Tab / ⇧Tab |
| Move selection / extend selection | ↑ ↓ / ⇧↑ ⇧↓ |
| Script | |
| Choose Voice… | ⌘⇧B |
| Generate | ⌘G |
| Add Line | ⌘⌥L |
| Duplicate Line | ⌘D |
| Delete Line | ⌘⌫ |
| Split into Sentences | ⌘⇧Return |
| Move Line Up / Down | ⌘⌥↑ / ⌘⌥↓ |
| New Tab | ⌘T |
| Close Tab | ⌘⇧W |
| Next / Previous Tab | ⌘⇧] / ⌘⇧[ |
| STRESS selected words (while editing) | ⌥⇧S |
| Expand / compact tag toolbar | ⌘⇧T |
| Playback & delivery | |
| Play / stop selection | Space |
| Spot to DAW | S (in select mode) |
| View | |
| Show / Hide Inspector | ⌘⌥I |
| Zoom In / Zoom Out / Actual Size | ⌘= / ⌘- / ⌘0 |
Where your files live
Inside a project folder
A Robot Voice Bridge project is a plain folder:
| Item | What it is |
|---|---|
<Name>.rvb | Project data: script, voices, settings, and pronunciation entries. Double-click to open the project. |
Audio Files/Generated | Generated takes. |
Audio Files/Recordings | Voice direction recordings and imported direction files. |
Audio Files/Imports, Audio Files/Exports | Working folders for imported and exported audio. |
.voicebridge (hidden) | Cache index and crash-recovery snapshots. Leave it in place. |
Backing up: copy or zip the entire project folder.
Outside the project
- Caches:
~/Library/Caches/SilverShadowSound.VoiceBridgecontains raw generation output and preview files. It is safe to delete. Robot Voice Bridge recreates what it needs. - Keychain: your ElevenLabs API key and Robot Voice Bridge license are stored in macOS Keychain.
- Custom tags: app-wide custom tags are stored in
~/Library/Application Support/VoiceBridge.
For a clean reinstall, see Troubleshooting.
Updating
Choose Robot Voice Bridge → Check for Updates…. Robot Voice Bridge also checks automatically and offers new versions when available. Updates install in place and do not modify your projects. See what changed in each version on the release notes page.
If a project reports that it was created with a newer version of Robot Voice Bridge, update the app and reopen it. If update checking fails, see Troubleshooting.
Need more help?
For errors and known failure cases, see Troubleshooting.
For general help, see Support. When contacting support, include your Robot Voice Bridge version (Robot Voice Bridge → About), macOS version, DAW and DAW version, and the exact text of any error message.